Summer's here, and so is a release we've been looking forward to. The headliner is Required on Duplicate, graduating to live servers after its run on GoEarly. Duplicates used to be a mechanism for exclusively adding weight to existing feedback. Now they can carry real context forward into your views, reporting, and exports. Over on GoEarly, we're previewing Centralized Jira Integration, which lets you set up your Jira connections once at the community level and share them across projects. Before we get into the features, though, here's a change behind the scenes that we're genuinely excited about.
#An exciting change in how we ship
We've changed how we build and deliver Centercode behind the scenes, and it's a change we're excited about, because you're the one who benefits. What it means for you: we can get new capabilities into your hands sooner, react faster when you need something adjusted, and roll out improvements without interrupting your work. It's the kind of thing you'll feel more and more as we go.
New Features
#✨ New Features ✨
#Required on Duplicate
When a participant runs into something another participant already reported, they have two quick ways to say "me too": voting on an existing issue, or matching a predictive suggestion as they submit. Both paths used to do the same thing behind the scenes. They added one to a counter. You knew more people hit the issue, but not what was different about each encounter: their device, their build, the time it happened, the steps that led there.
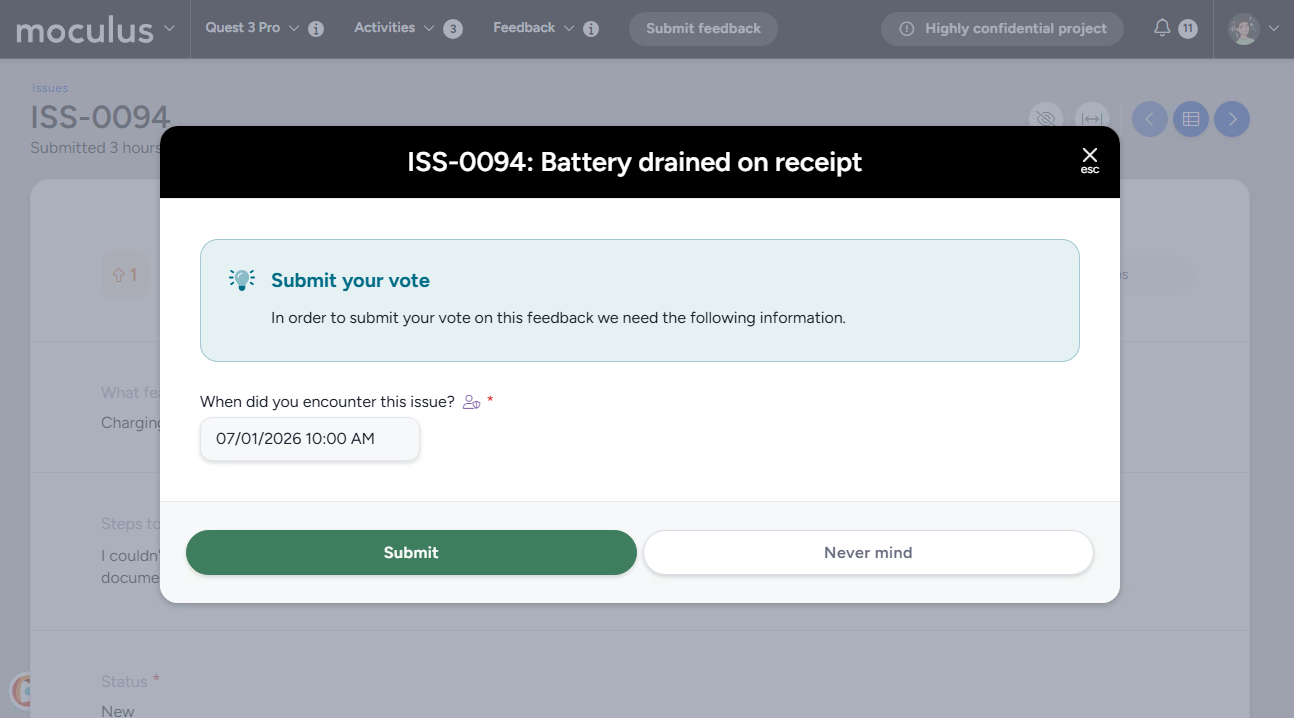 Required on Duplicate closes that gap. You can now flag specific form elements as required on duplicate, so that when a participant claims an existing issue, they're prompted to fill in just those fields before the duplicate is recorded. A focused popup appears with only the fields you've marked, nothing else, so it stays quick for the participant while capturing what your team actually needs to triage.
 That captured context travels with the duplicate. Each "me too" now creates a real duplicate submission, linked to the original, with the participant's data attached. From there it flows into your comparison view, reporting, and exports, the same as any other feedback. You're triaging from what people actually reported, not from a count and a guess.
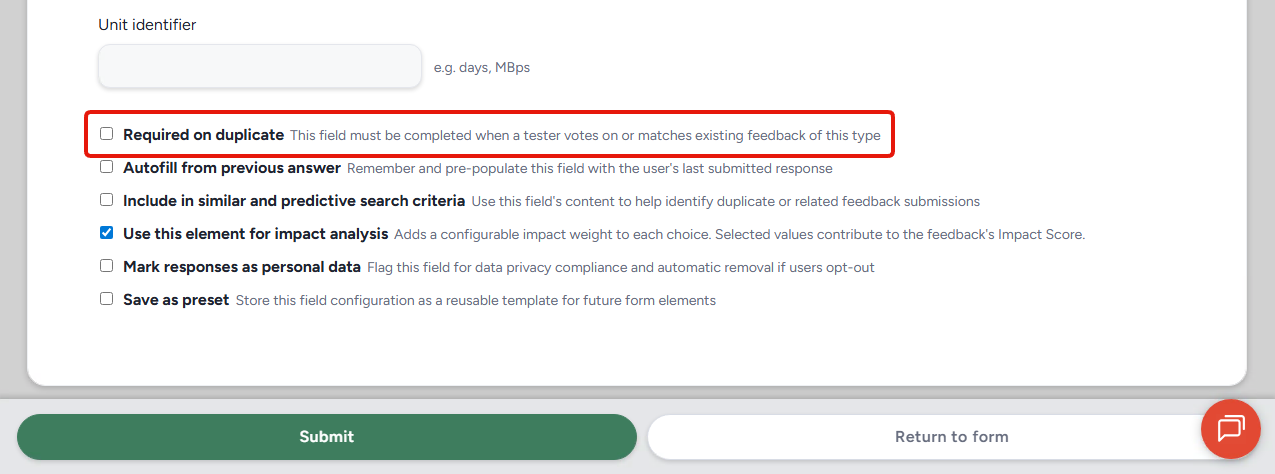
Setting it up is per element and entirely up to you. Inside a feedback type, open the form element you want to collect on a duplicate and turn on required on duplicate. Good candidates are short, high-signal fields like time, device, build, and steps to reproduce. Eligible field types include text inputs, date and time pickers, single and multi-select drop-downs, and rating elements. File uploads, AI-enhanced fields, and read-only elements stay out of the duplicate flow to keep the popup fast. If a participant cancels the popup, no duplicate is recorded, so only complete submissions count.
A few things worth knowing. Duplicates collected before you turned the setting on will show blanks for those fields, since the data wasn't requested at the time. The same participant can log more than one occurrence on the same issue, which is intentional. And if you ever remove a duplicate relationship, the context you collected stays put. Read more here!
#💡 GoEarly Features 💡
#Centralized Jira Integration
If you run Jira integrations across more than a couple of projects, you know the drill. Every project, every feedback type, the same credentials maintained by hand. When an access token expires, you go update them one at a time, and there's no single place to see which projects share a connection or whether a key still has access.
Centralized Jira Integration, now previewing on GoEarly, lets you manage your Jira connections once at the community level instead of project by project. Set up a connection a single time, with its name, base URL, authentication type, and credentials, and share it everywhere it's needed. Each connection shows which projects rely on it and when it was last edited, so you finally have a clear picture of what's connected to what.
Project-level destinations gain a connection-source choice. Point a destination at a shared community connection, or keep using project-specific credentials exactly as you do today. Nothing about your existing setups changes unless you decide to move them, and your credentials are preserved through every step: switching to a shared connection, having one removed, and recovering.
Our favorite part is the built-in Test action. It checks a connection and shows you which Jira projects it can actually reach, which catches the most common snag we see in support: a key that connects just fine but quietly lacks access to the project you're aiming at. Instead of guessing, you get a straight answer.
Want a first look? Sign up for GoEarly now!
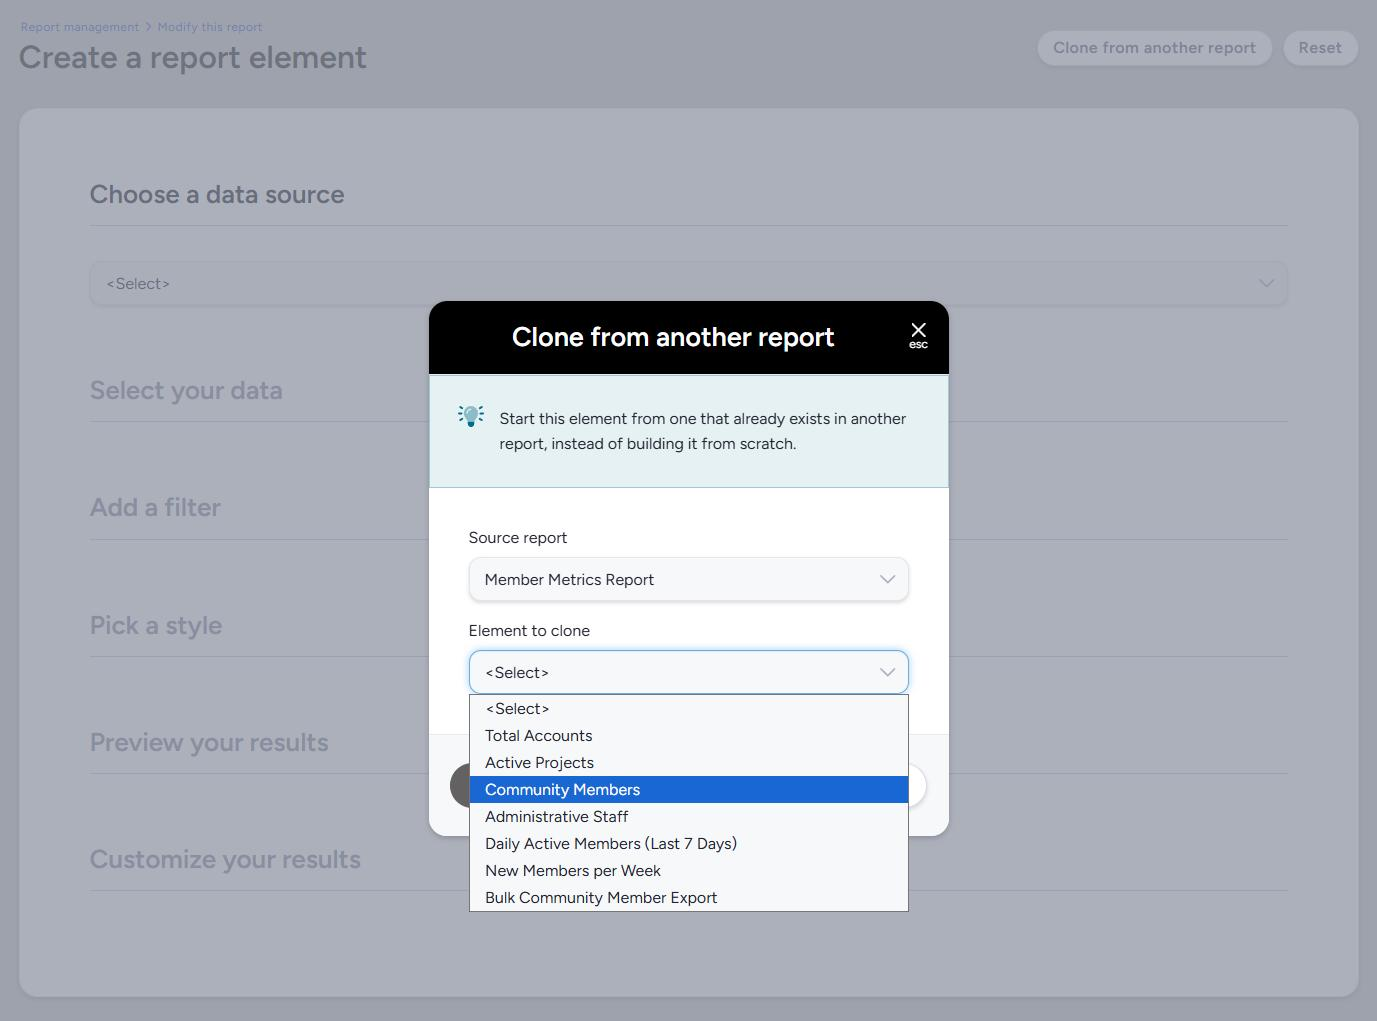 Report elements take real work to get right. You pick the data, build the filter, choose the style, and maybe write an AI prompt worth keeping. Once you've done all that, you shouldn't have to do it twice. Report element cloning gives you two ways to reuse what you've already built.
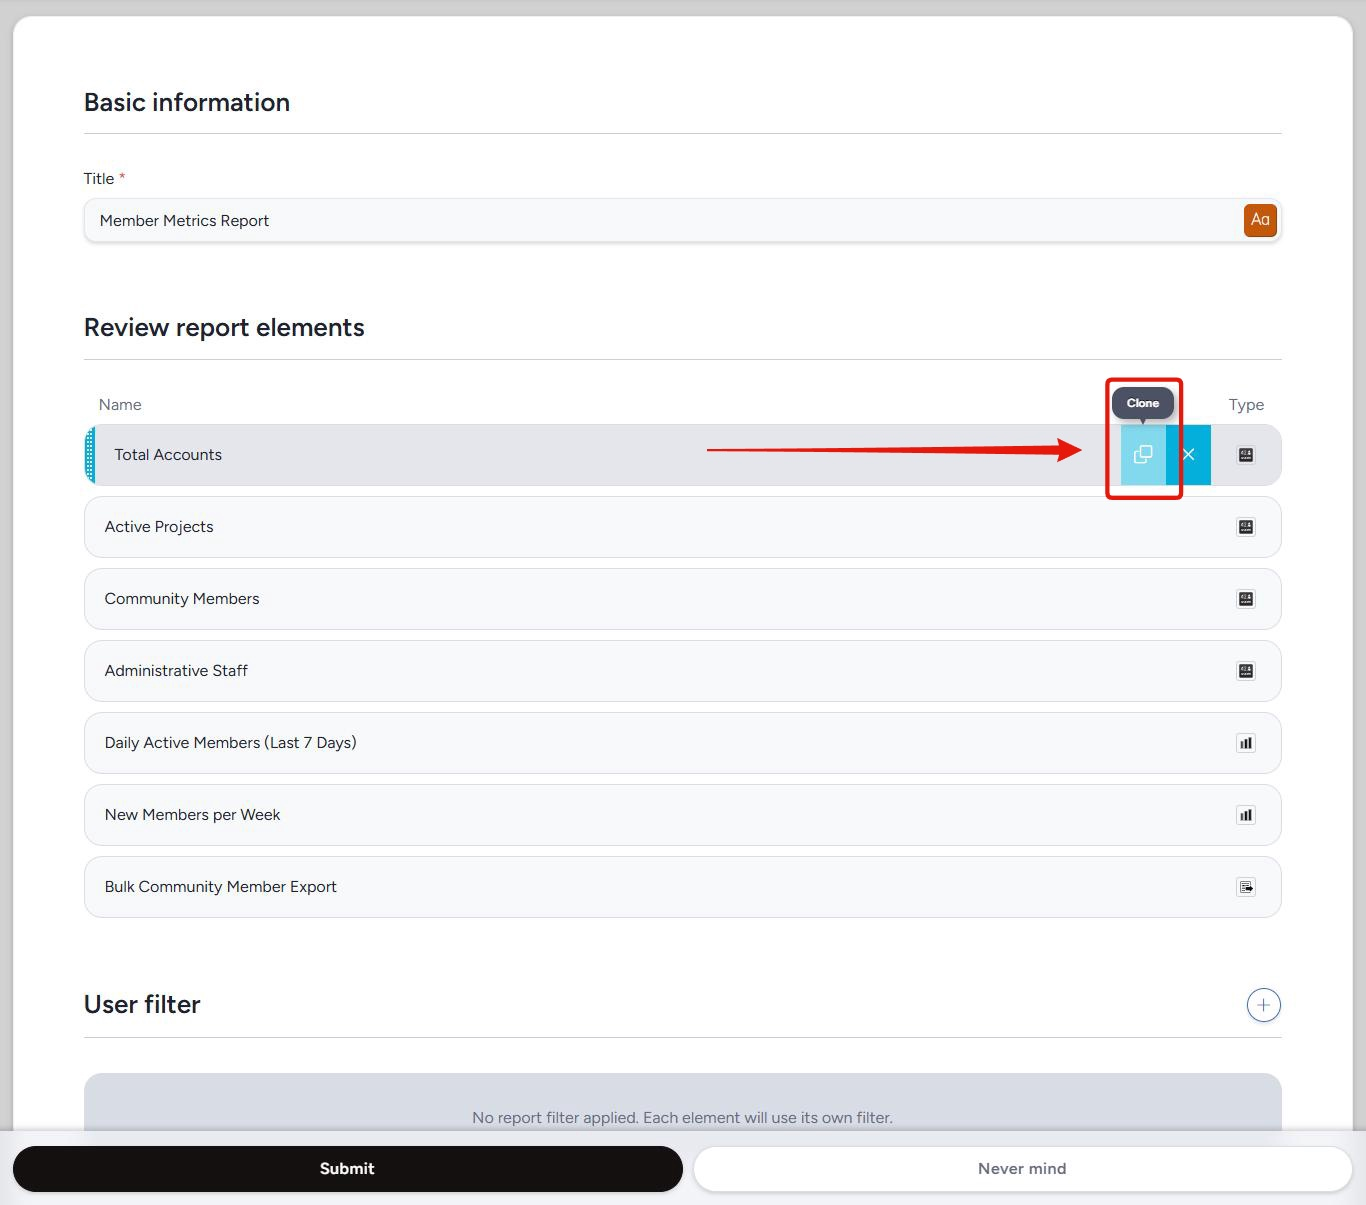 Duplicate in place. Want a few variations of the same chart in one report? Hover any element on the Modify this report page and click the clone control next to remove. A copy drops in directly below the original, and everything beneath it moves down one spot. The copy keeps the original's name exactly. We didn't add "(2)" or "Copy of" to the name, because those labels pile up fast once you've made a few copies. Rename it whatever makes sense.
 See it in action:
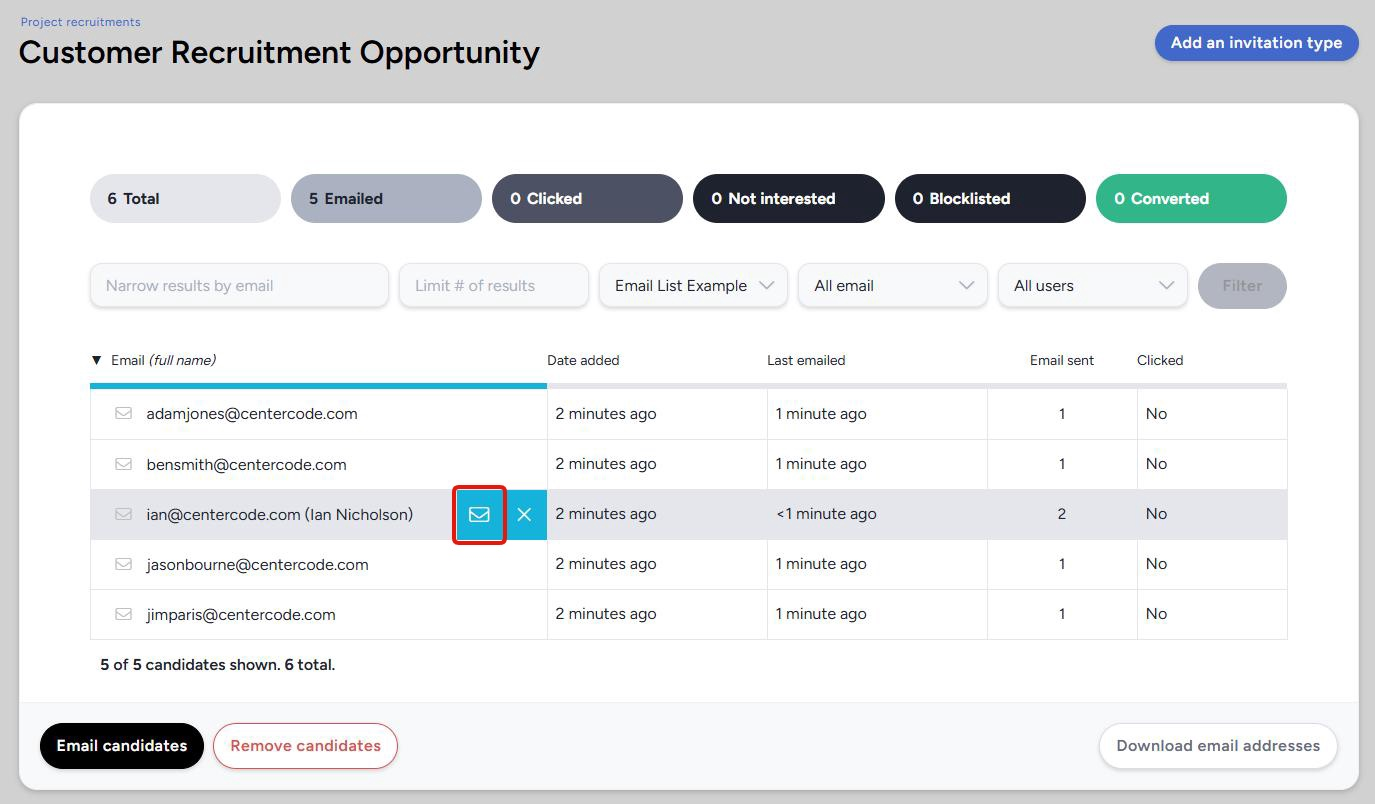 One catch worth knowing: it has to be a single send to that one person. The bulk email button at the bottom of the pool, the one that goes to everyone matching your filter, does not restart anyone's allowance, because it doesn't record who it reached individually. Sending from the pool never uses up a candidate's own allowance either, so you can send as freely as you like. It can only help them.
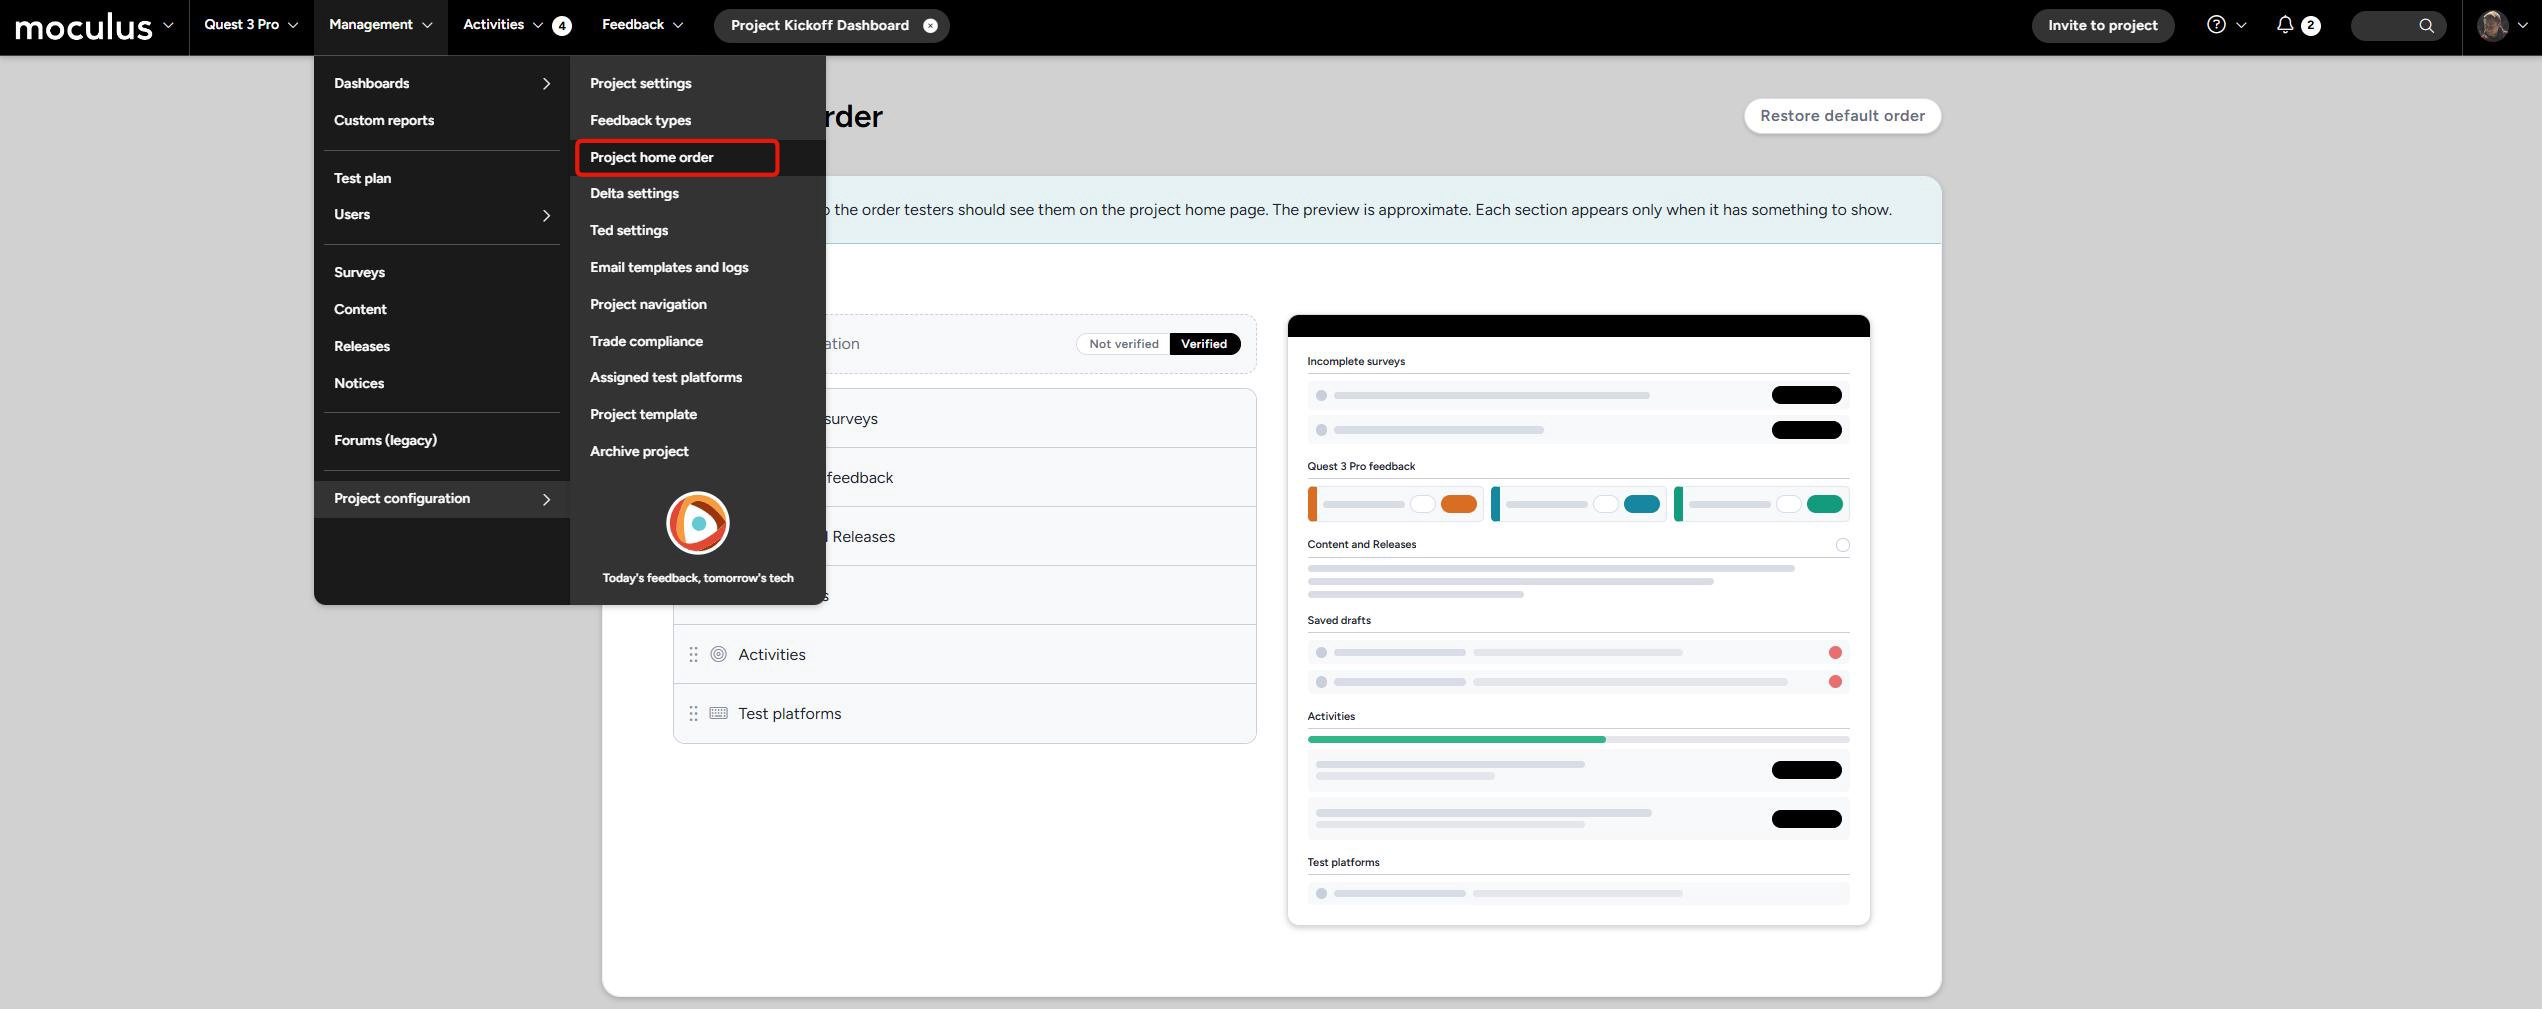 The Project Home has always rendered its sections in a fixed sequence we chose. That worked fine until it didn't. A hardware program that ships units wants Activities up top to drive completion. A research team wants Feedback first, because collecting it is the whole point. A project that briefs participants before anything else wants Content leading. One order was never going to serve all three.
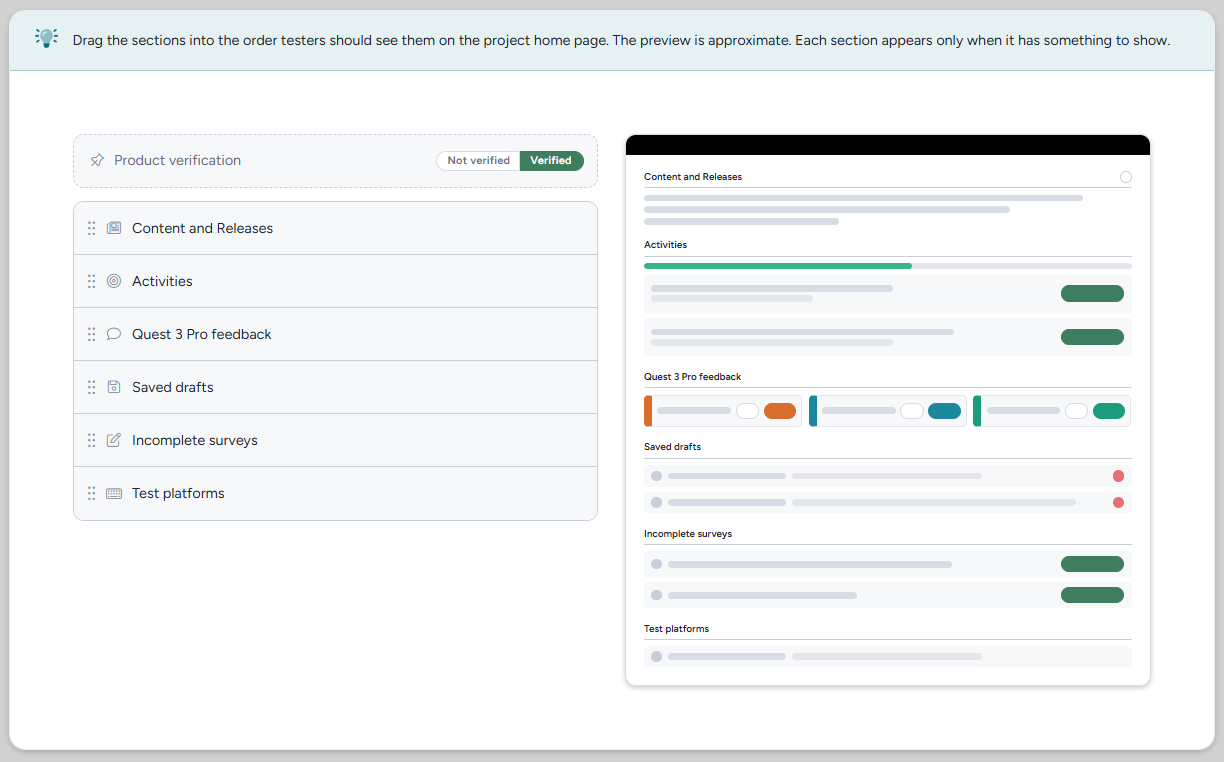 One saved order applies to everyone in the project, and the same order drives desktop and mobile. Each participant still sees only the sections they're entitled to, arranged the way you set them. Sections with nothing in them keep hiding themselves exactly as they do today, and they hold their configured position for whenever they do have content. You'll never end up with an empty placeholder just because you moved something.
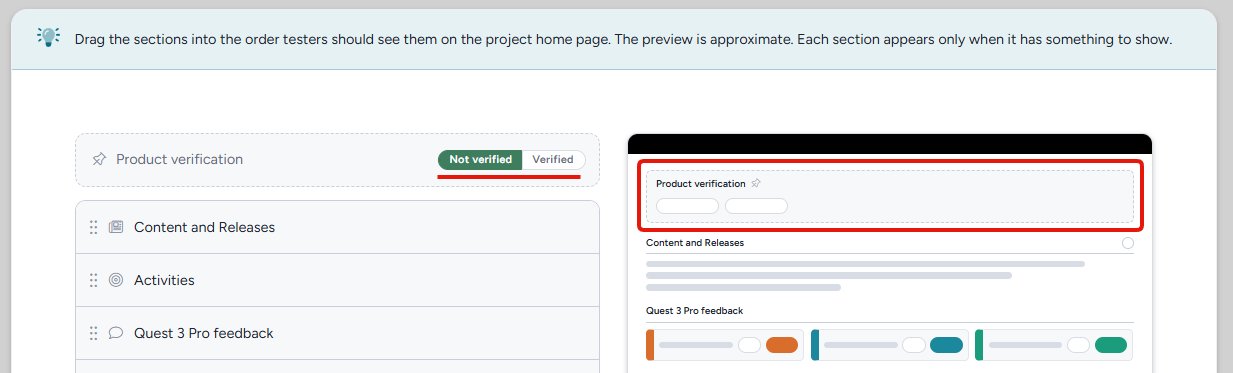 Product Verification isn't one of the reorderable sections. It's pinned, and as of this release it's pinned to the top of Project Home rather than sitting below Feedback. If your project uses Product Verification, this is the one thing that looks different on release day without anyone touching a setting. If your project doesn't use it, nothing moves.
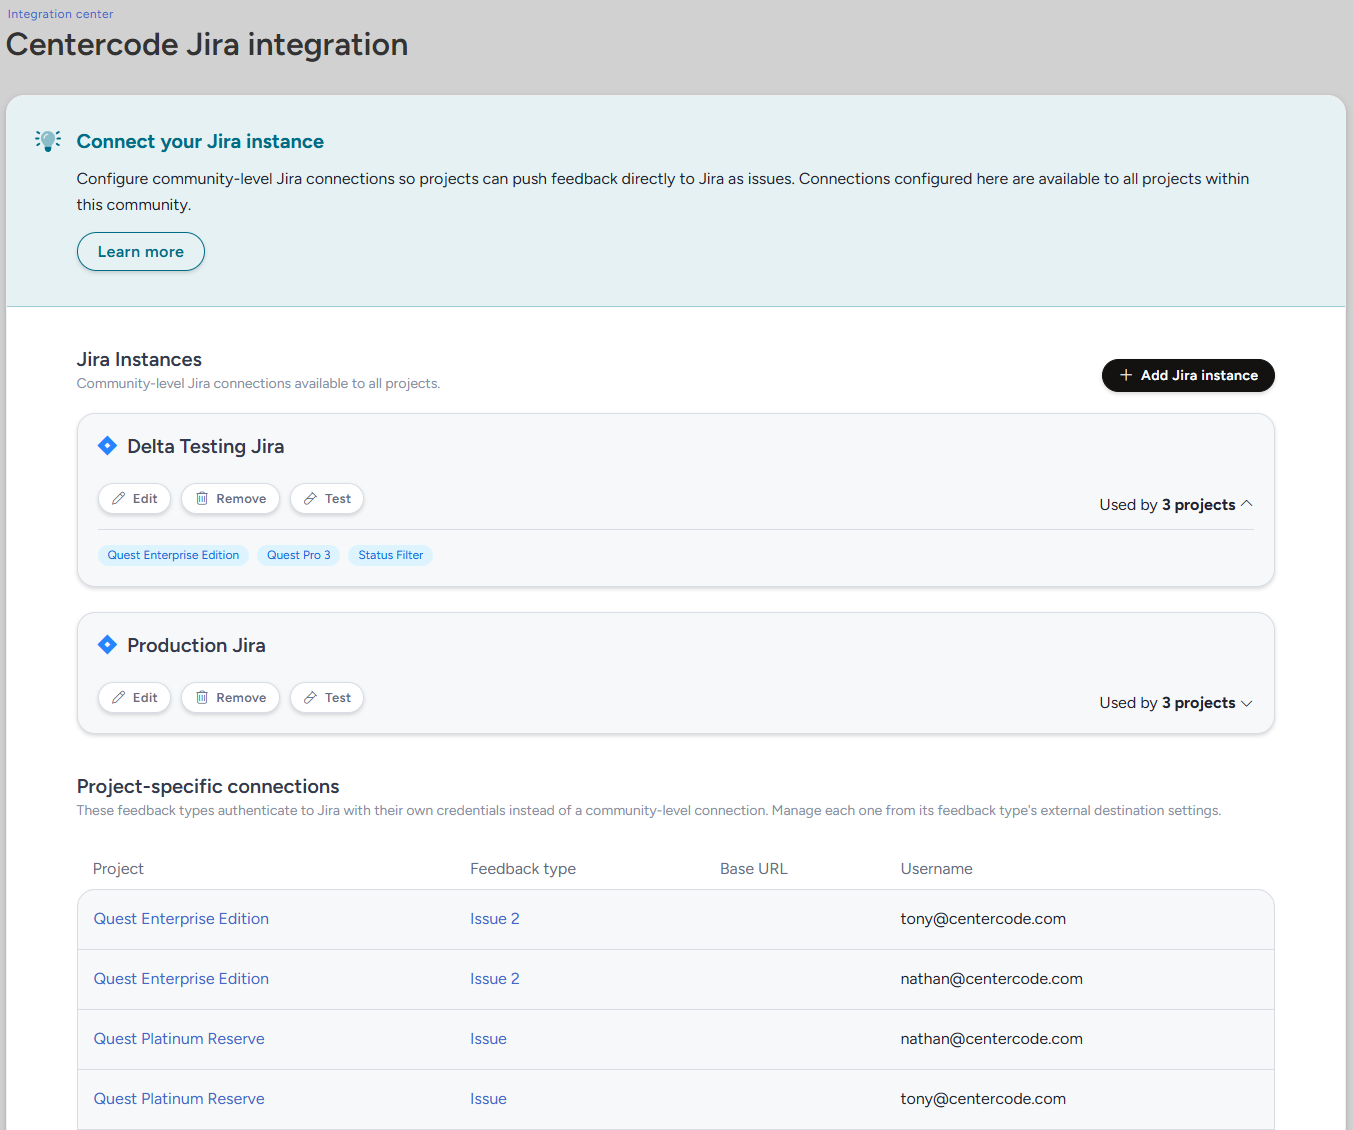 Each connection stores an instance name, a base URL, an authentication scheme (basic with a username and API token, or bearer with a personal access token), and the credentials themselves, encrypted at rest. You can set up as many instances as you need, so an engineering Jira and a support Jira can happily coexist.
 Every connection card has a Test button. Select it and we call Jira, then show you the list of Jira projects those credentials can actually reach, 30 at a time. It's a quick confirmation rather than a project browser, and it catches the situation that generates the most support tickets today: a token that authenticates perfectly well but lacks the access the sync needs downstream. A successful test shows a green Connected badge. A failure shows a red Connection unsuccessful with the reason in plain language, like Token expired or Could not reach Jira at this URL. Save credentials without testing them and the card sits at Untested until you do.
 In a project, the authentication fields on the Jira external destination are replaced by a Connection source drop-down. It lists your community's connections alphabetically, with Project-specific connection at the bottom. Choose a community connection and the instance details display read-only, so you go straight to the JSON mapping without hunting down a token. For a one-off integration, like a contractor's Jira account, choose Project-specific connection and enter the base URL, authentication scheme, and credentials the way you do today.
 Switching between the two is safe in both directions. When you move a project from its own credentials to a community connection, the original credentials stay put behind the scenes, obfuscated. If that community connection later disappears, flip back to Project-specific connection and everything you entered is still there waiting.
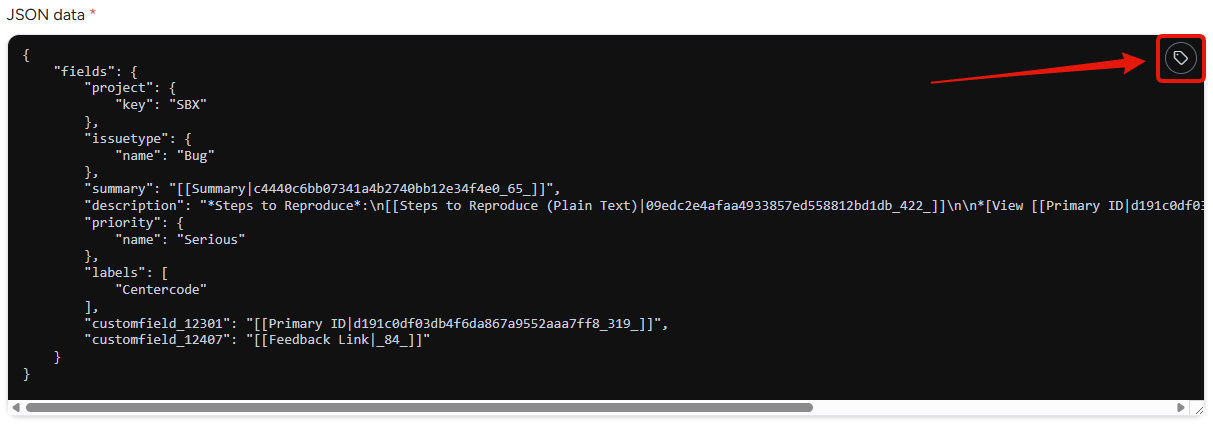 The old inline drop-down for inserting dynamic tags into the JSON editor is retired. The dynamic tag button now opens the same search modal you already use elsewhere in the platform. Park your cursor in the JSON, open the modal, add the tags you need, close it, then move them where they belong.